


Pulumi is a powerful tool that enables developers to create and manage cloud infrastructure as code. With Pulumi, you can use popular programming languages like TypeScript, Python, and Go to define your infrastructure in a way that is familiar and intuitive. This means that you can leverage your existing skills and knowledge to create and manage your cloud resources without having to learn a new language or tool.
Pulumi also provides powerful features like automatic drift detection, which alerts you when your infrastructure is out of sync with your code, and a powerful CLI that makes it easy to deploy and manage your infrastructure from the command line
Let's explore the Many Benefits of Pulumi
There are several reasons why someone might choose to use Pulumi:
Familiar programming languages: With Pulumi, developers can write infrastructure code in familiar programming languages such as Python, TypeScript, and Go, rather than using domain-specific languages (DSLs) like Terraform's HCL or CloudFormation's YAML. This can make it easier for developers to learn and adopt infrastructure as code.
Cross-cloud support: Pulumi supports multiple cloud providers, including AWS, Azure, Google Cloud, and Kubernetes. This allows developers to use a consistent set of tools and processes across different cloud platforms.
Infrastructure as software: Pulumi allows developers to treat infrastructure as software, using version control and software development practices such as code review and testing. This can help reduce the risk of errors and make it easier to collaborate on infrastructure code.
Resource abstractions: Pulumi provides abstractions for common infrastructure resources such as virtual machines, databases, and container clusters. This can simplify the process of creating and managing complex infrastructure configurations.
Team collaboration: Pulumi provides features for team collaboration such as access control and audit logs. This can help organizations manage infrastructure code across multiple teams and projects.
Monitoring and debugging: Pulumi provides tools for monitoring and debugging infrastructure resources. This can help developers identify and resolve issues more quickly.
Installing PULUMI :
To install pulumi on Linux you just need to do the following steps :
$ curl -fsSL https://get.pulumi.com | sh
This will install the pulumi CLI to ~/.pulumi/bin and add it to your path. When it can’t automatically add pulumi to your path, you will be prompted to add it manually.
$ pulumi version
This will display the version number of Pulumi installed on your system. If Pulumi is not installed, or if the version number is not displayed, you may need to install Pulumi first using your preferred installation method.
For your preferred choice of OS, you can refer to this official documentation of Pulumi https://www.pulumi.com/docs/get-started/install/
Finally, you can configure Pulumi with your cloud provider credentials by running the following command in your terminal:
$ pulumi login
If Pulumi is not installed, or if the version number is not displayed, you may need to install Pulumi first using your preferred installation method.
Let's get started with pulumi for a simple AWS Example :
Before we begin make sure you have go installed on your machine. You can verify it using $ go version
Then you need to configure pulumi to use your aws account . For Linux-based OS you can run the following with the required value.
$ export AWS_ACCESS_KEY_ID=<YOUR_ACCESS_KEY_ID>
$ export AWS_SECRET_ACCESS_KEY=<YOUR_SECRET_ACCESS_KEY>
Create a New Project in Pulumi :
$ mkdir new-project && cd new-project$ pulumi new aws-goThese two commands create a new directory called "new-project" and then move the current working directory to that directory.
The second command initializes a new Pulumi project using the AWS Go template. This template sets up a basic Pulumi project with the necessary files and configurations to create and manage AWS resources using Go.
Once you have logged in, the CLI will guide you through the process of creating a new project.
During this process, you will be prompted to enter a
project name and description. You can either accept the default values by pressingENTERor provide custom values as per your preference.Next, you will be asked for a stack name. Hit
ENTERto accept the default value ofdevor you can provide your custom name.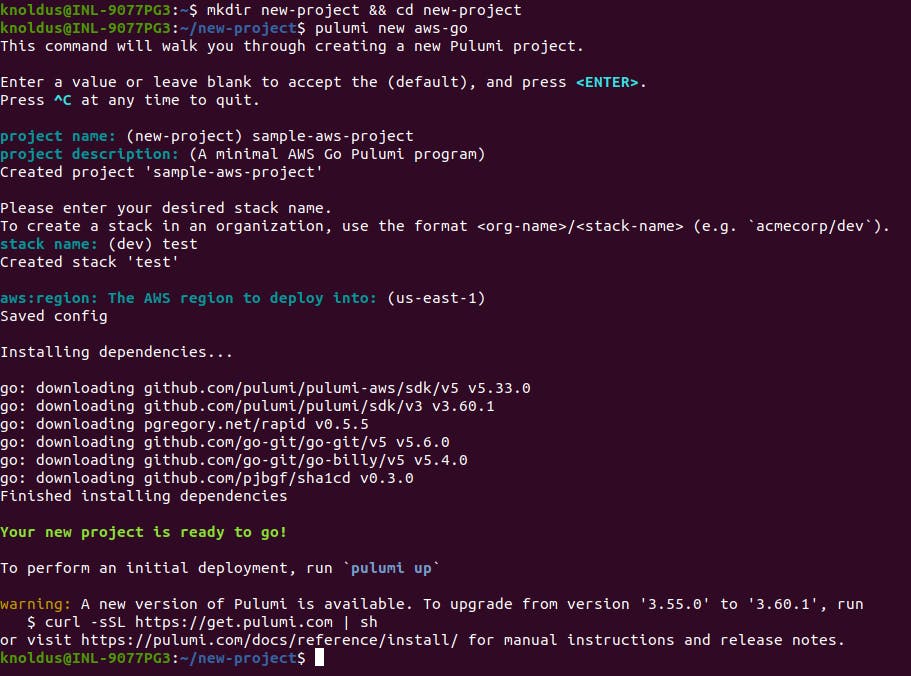
Once the command has finished executing, your project and stack will be ready to use with Pulumi.
The next step is to review the project files that have been generated by the CLI. These files will include the necessary configurations and code to deploy and manage your infrastructure on the cloud provider of your choice.
By reviewing these files, you can get a better understanding of how Pulumi works and how you can customize your infrastructure deployment to suit your specific needs.
Review the New Project
Let's take a look at some of the files that were generated for this project:

Pulumi.yaml: This file defines the project and its metadata, including the project name, description, and dependencies. It also specifies the cloud provider that the project will use.
Pulumi.dev.yaml: This file contains configuration values specific to the development environment. It includes settings such as the AWS region, the default VPC ID, and other resources that the stack will use.
main.go: This file contains the Pulumi program that defines the stack resources. It is the main entry point for your infrastructure as code and is where you will define the cloud resources that your application needs.
Now, let's take a closer look at the main.go file to understand how Pulumi uses code to define and manage infrastructure resources.
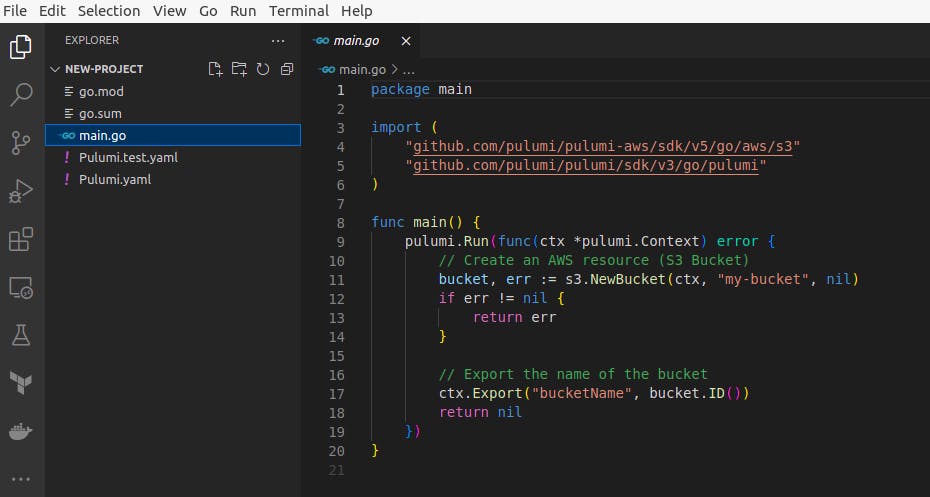
This Pulumi program creates a new S3 bucket and exports the name of the bucket.
Deploy the stack :
Let’s go ahead and deploy your stack: $ pulumi up
The "pulumi up" command will analyze your code and identify the modifications that need to be made to the resources. Before executing the update, a preview will be displayed showing the anticipated changes.
After the preview is complete, you will be presented with three options to select from. If you choose "details," a detailed difference report of the modifications to be made will be displayed. If you choose "yes," the update operation will be executed, and your new S3 bucket will be created in AWS. Alternatively, if you choose "no," you will be returned to the user prompt without making any changes.
Choose "yes" and after some time your S3 bucket will be ready. You can verify it on your AWS portal.
That's it for this blog. I will come back with more interesting examples.
For one more use case on Pulumi, refer to this blog: https://saumyapandey.hashnode.dev/getting-started-with-pulumi-for-a-simple-aws-project-a-step-by-step-guide