


If you're just getting started with Pulumi, be sure to check out my introductory blog post on the topic. In that post, I provided an overview of Pulumi and its key features, as well as a step-by-step guide for setting up a simple Pulumi project on AWS.
In this blog post, we'll dive deeper into the capabilities of Pulumi and explore how it can help you streamline your infrastructure management. So whether you're a seasoned cloud infrastructure expert or just getting started with infrastructure as code, this blog post will provide you with the knowledge and tools you need to take your Pulumi skills to the next level.
Pulumi templates
Pulumi provides several predefined templates that you can use to get started with creating infrastructure as code for various cloud providers. These templates include pre-written code and configuration files that can help you get up and running quickly with Pulumi.
Some of the available templates for Pulumi include:
aws-go: A basic template for creating AWS infrastructure with Pulumi using the Go programming language.azure-csharp: A template for creating Azure infrastructure using C#.gcp-python: A template for creating Google Cloud Platform infrastructure using Python.kubernetes-typescript: A template for creating Kubernetes resources using TypeScript.openstack-python: A template for creating OpenStack infrastructure using Python.
To use one of these templates, you can run the pulumi new command followed by the template name. For example, to create a new AWS project using the aws-go template, you would run:
pulumi new aws-go
You can also create your own custom templates if the predefined ones do not meet your needs.
Virtual machine on AWS with Pulumi templates
Before we begin make sure you have go installed on your machine. You can verify it using $ go version
Then you need to configure pulumi to use your aws account . For Linux-based OS you can run the following with the required value.
$ export AWS_ACCESS_KEY_ID=<YOUR_ACCESS_KEY_ID>
$ export AWS_SECRET_ACCESS_KEY=<YOUR_SECRET_ACCESS_KEY>
Create a New Project in Pulumi :
mkdir new-vm-aws && cd new-vm-awsInitializes a new Pulumi project using the AWS Go template
pulumi new vm-aws-go
The pulumi new vm-aws-go command is used to create a new Pulumi project using the vm-aws-go template.
The vm-aws-go template is a predefined Pulumi template that allows you to create and manage an Amazon Web Services (AWS) virtual machine (VM) instance using the Go programming language.
When you run the pulumi new vm-aws-go command, Pulumi will create a new project directory with the necessary files and folders to get started with creating and deploying your AWS VM using Pulumi.
You can then modify the main.go file to define your VM instance's properties, such as the instance type, network settings, and disk configuration. Once you have made your changes, you can deploy your VM instance using the pulumi up command.
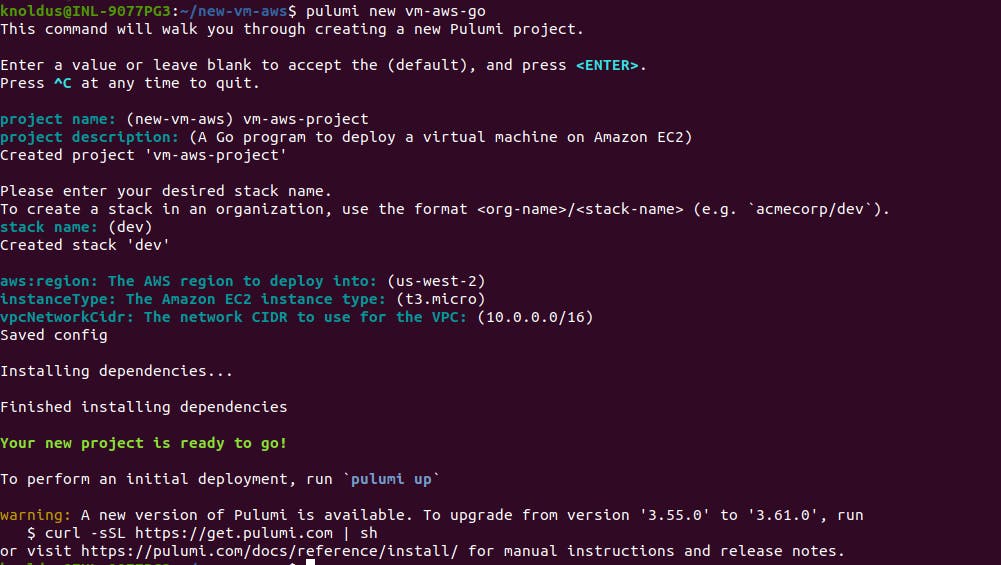
You can change the default values related to project-name , project-description , stack-name , aws-region , instanceType and vpcNetworkCidr according to your use case.
Let's explore the set of files that have been created :

go.mod is a file used in Go programming language projects to manage dependencies. It is used to declare the packages and versions that your project depends on, as well as the minimum version of Go required by your project.
go.sum is a file that contains the expected cryptographic checksums of the content of specific module versions. It is used by Go's module system to ensure the integrity and security of downloaded modules.
Pulumi.yaml is a configuration file used in Pulumi projects to define the project and its settings. It contains metadata about the project such as the project name, description, and version, as well as the configuration values for the stack.

Pulumi.dev.yaml is a configuration file used in Pulumi projects to define the configuration values for a specific stack. Each stack in a Pulumi project can have its own configuration values, and the Pulumi.dev.yaml file is used to store the configuration values for the dev stack.
The Pulumi.dev.yaml file is created automatically when a new stack is initialized with the pulumi stack init command, and can be edited directly to modify the configuration values for the dev stack. These configuration values can include things like AWS region, instance types, and other parameters specific to the stack.
When the pulumi up command is run to deploy a stack, the Pulumi CLI will read the configuration values from the Pulumi.dev.yaml file and use them to provision the resources in the stack. This allows you to easily manage multiple stacks with different configuration values, such as development, staging, and production environments.

main.go
package main

import (
    "fmt"
    "github.com/pulumi/pulumi-aws/sdk/v5/go/aws/ec2"
    "github.com/pulumi/pulumi/sdk/v3/go/pulumi"
    "github.com/pulumi/pulumi/sdk/v3/go/pulumi/config"
)

func main() {
    pulumi.Run(func(ctx *pulumi.Context) error {
        // Get some configuration values or set default values.
        cfg := config.New(ctx, "")
        instanceType := "t3.micro"
        if param := cfg.Get("instanceType"); param != "" {
            instanceType = param
        }
        vpcNetworkCidr := "10.0.0.0/16"
        if param := cfg.Get("vpcNetworkCidr"); param != "" {
            vpcNetworkCidr = param
        }

        // Look up the latest Amazon Linux 2 AMI.
        ami, err := ec2.LookupAmi(ctx, &ec2.LookupAmiArgs{
            Filters: []ec2.GetAmiFilter{
                ec2.GetAmiFilter{
                    Name: "name",
                    Values: []string{
                        "amzn2-ami-hvm-*",
                    },
                },
            },
            Owners: []string{
                "amazon",
            },
            MostRecent: pulumi.BoolRef(true),
        }, nil)
        if err != nil {
            return err
        }

        // User data to start a HTTP server in the EC2 instance
        userData := "#!/bin/bash\necho \"Hello, World from Pulumi!\" > index.html\nnohup python -m SimpleHTTPServer 80 &\n"

        // Create VPC.
        vpc, err := ec2.NewVpc(ctx, "vpc", &ec2.VpcArgs{
            CidrBlock:          pulumi.String(vpcNetworkCidr),
            EnableDnsHostnames: pulumi.Bool(true),
            EnableDnsSupport:   pulumi.Bool(true),
        })
        if err != nil {
            return err
        }

        // Create an internet gateway.
        gateway, err := ec2.NewInternetGateway(ctx, "gateway", &ec2.InternetGatewayArgs{
            VpcId: vpc.ID(),
        })
        if err != nil {
            return err
        }

        // Create a subnet that automatically assigns new instances a public IP address.
        subnet, err := ec2.NewSubnet(ctx, "subnet", &ec2.SubnetArgs{
            VpcId:               vpc.ID(),
            CidrBlock:           pulumi.String("10.0.1.0/24"),
            MapPublicIpOnLaunch: pulumi.Bool(true),
        })
        if err != nil {
            return err
        }

        // Create a route table.
        routeTable, err := ec2.NewRouteTable(ctx, "routeTable", &ec2.RouteTableArgs{
            VpcId: vpc.ID(),
            Routes: ec2.RouteTableRouteArray{
                &ec2.RouteTableRouteArgs{
                    CidrBlock: pulumi.String("0.0.0.0/0"),
                    GatewayId: gateway.ID(),
                },
            },
        })
        if err != nil {
            return err
        }

        // Associate the route table with the public subnet.
        _, err = ec2.NewRouteTableAssociation(ctx, "routeTableAssociation", &ec2.RouteTableAssociationArgs{
            SubnetId:     subnet.ID(),
            RouteTableId: routeTable.ID(),
        })
        if err != nil {
            return err
        }

        // Create a security group allowing inbound access over port 80 and outbound
        // access to anywhere.
        secGroup, err := ec2.NewSecurityGroup(ctx, "secGroup", &ec2.SecurityGroupArgs{
            Description: pulumi.String("Enable HTTP access"),
            VpcId:       vpc.ID(),
            Ingress: ec2.SecurityGroupIngressArray{
                &ec2.SecurityGroupIngressArgs{
                    FromPort: pulumi.Int(80),
                    ToPort:   pulumi.Int(80),
                    Protocol: pulumi.String("tcp"),
                    CidrBlocks: pulumi.StringArray{
                        pulumi.String("0.0.0.0/0"),
                    },
                },
            },
            Egress: ec2.SecurityGroupEgressArray{
                &ec2.SecurityGroupEgressArgs{
                    FromPort: pulumi.Int(0),
                    ToPort:   pulumi.Int(0),
                    Protocol: pulumi.String("-1"),
                    CidrBlocks: pulumi.StringArray{
                        pulumi.String("0.0.0.0/0"),
                    },
                },
            },
        })
        if err != nil {
            return err
        }

        // Create and launch an EC2 instance into the public subnet.
        server, err := ec2.NewInstance(ctx, "server", &ec2.InstanceArgs{
            InstanceType: pulumi.String(instanceType),
            SubnetId:     subnet.ID(),
            VpcSecurityGroupIds: pulumi.StringArray{
                secGroup.ID(),
            },
            UserData: pulumi.String(userData),
            Ami:      pulumi.String(ami.Id),
            Tags: pulumi.StringMap{
                "Name": pulumi.String("webserver"),
            },
        })
        if err != nil {
            return err
        }

        // Export the instance's publicly accessible IP address and hostname.
        ctx.Export("ip", server.PublicIp)
        ctx.Export("hostname", server.PublicDns)
        ctx.Export("url", server.PublicDns.ApplyT(func(publicDns string) (string, error) {
            return fmt.Sprintf("http://%v", publicDns), nil
        }).(pulumi.StringOutput))
        return nil
    })
}
main.go contains the Go program that provisions an Amazon Web Services (AWS) Virtual Private Cloud (VPC) and launches an EC2 instance inside it using the Pulumi Infrastructure as Code (IaC) tool. The EC2 instance runs a simple HTTP server that serves the contents of an index.html file.
The program uses the Pulumi SDK and the github.com/pulumi/pulumi-aws/sdk/v5/go/aws/ec2 package to create the VPC, an internet gateway, a subnet with public IP addressing, a route table, and a security group to allow inbound access over port 80 and outbound access to anywhere. Finally, the program launches an EC2 instance with Amazon Linux 2 as the operating system, a user data script to start a Python HTTP server and serve an index.html file, and tags the instance with the "Name" value "webserver".
The program retrieves some configuration values using the config.New() function, such as the instance type and the VPC network CIDR block, and sets default values if they are not provided. The program also uses the LookupAmi() function to find the latest Amazon Linux 2 AMI.
Deploy the stack :
Let’s go ahead and deploy your stack:
$ pulumi upBefore executing the update, a preview will be displayed showing the anticipated changes. You can select
yeshere, and your deployment will start .You can even see the live preview on
pulumi dashboardusing theLive Previewlink :
Destroy the Infrastructure and stack
pulumi destroyis a command in Pulumi that destroys a Pulumi stack and its resources. This command deletes all resources created by the stack and removes all records of the stack from the state file.To run the
pulumi destroycommand, you can execute the following command in your terminal:pulumi destroyYou may also need to specify the stack name or project name using the
--stackor--projectflags if you have multiple stacks or projects in your Pulumi account.
That's it for this blog . If you want to know more about Pulumi or want to see more use cases , you can get back to me .